Mastering Excel VBA Events: Automating Your Spreadsheets

Excel VBA (Visual Basic for Applications) empowers you to take control of your spreadsheets by automating various tasks. One of the key features of Excel VBA is its ability to respond to events, which are user actions or occurrences in the Excel environment. In this tutorial, we’ll explore several essential Excel VBA events and how you can use them to streamline your work. Let’s dive in.

1. Workbook Open Event

The Workbook Open Event allows you to execute code when you open a workbook. To use this event:

  • Open the Visual Basic Editor.
  • Double-click on “ThisWorkbook” in the Project Explorer.
  • Choose “Workbook” from the left drop-down list.
  • Choose “Open” from the right drop-down list.

Add the following code to the Workbook Open Event:

MsgBox "Good Morning"

Workbook Open Event Result

Save, close, and then reopen the Excel file. You’ll see a “Good Morning” message.

2. Worksheet Change Event

The Worksheet Change Event triggers when you change a cell in a worksheet. To set it up:

  • Open the Visual Basic Editor.
  • Double-click on a sheet (e.g., “Sheet1”) in the Project Explorer.
  • Choose “Worksheet” from the left drop-down list.
  • Choose “Change” from the right drop-down list.

Here’s an example of how to react to changes in cell B2:

If Target.Address = "$B$2" Then
    If Target.Value > 80 Then
        MsgBox "Goal Completed"
    End If
End If

Workbook Change Event Result

When you enter a value greater than 80 in cell B2, a message will appear.

3. BeforeDoubleClick Event

This event runs when you double-click a cell. Follow these steps:

  • Open the Visual Basic Editor.
  • Double-click on a sheet (e.g., “Sheet1”) in the Project Explorer.
  • Choose “Worksheet” from the left drop-down list.
  • Select “BeforeDoubleClick” from the right drop-down list.

Use this code to change the font color and cancel the default double-click action (cell edit mode):

Target.Font.Color = vbRed
Cancel = True

Worksheet BeforeDoubleClick Event Result

When you double-click a cell, it will turn red, and you won’t enter edit mode.

4. Highlight Active Cell

This feature highlights the row and column of the active cell. Implement it as follows:

  • Open the Visual Basic Editor.
  • Double-click on the sheet (e.g., “Sheet1”) in the Project Explorer.
  • Choose “Worksheet” from the left drop-down list.
  • Select “SelectionChange” from the right drop-down list.

Add this code:

Dim rowNumberValue As Integer, columnNumberValue As Integer, i As Integer, j As Integer

Cells.Interior.ColorIndex = 0

rowNumberValue = ActiveCell.Row
columnNumberValue = ActiveCell.Column

For i = 1 To rowNumberValue
    Cells(i, columnNumberValue).Interior.ColorIndex = 37
Next i

For j = 1 To columnNumberValue
    Cells(rowNumberValue, j).Interior.ColorIndex = 37
Next j

Highlight Active Cell in Excel VBA

Now, each time you change the active cell on Sheet1, the corresponding row and column will turn blue.

5. Create a Footer Before Printing

You can use this event to add a footer before printing your workbook. Follow these steps:

  • Open the Visual Basic Editor.
  • Double-click on “ThisWorkbook” in the Project Explorer.
  • Choose “Workbook” from the left drop-down list.
  • Choose “BeforePrint” from the right drop-down list.

Use this code to create a left footer with the workbook’s full name:

ActiveSheet.PageSetup.LeftFooter = ActiveWorkbook.FullName

Footer

This will set the left footer of the printed document to the full name of your workbook.

6. Bills and Coins

This event helps you split an amount of money into bills and coins. Configure it this way:

  • Open the Visual Basic Editor.
  • Double-click on the sheet (e.g., “Sheet1”) in the Project Explorer.
  • Choose “Worksheet” from the left drop-down list.
  • Select “Change” from the right drop-down list.

Insert this code to handle the amount splitting:

Dim amount As Double, i As Integer

If Target.Address = "$B$2" Then
    amount = Range("B2").Value
    Range("B5:B16").Value = ""
    
    For i = 5 To 16
        Do While amount >= Cells(i, 1).Value
            Cells(i, 2).Value = Cells(i, 2).Value + 1
            amount = amount - Cells(i, 1).Value
        Loop
    Next i
End If

Bills and Coins Result

Now, when you change the value in cell B2 on Sheet1, Excel VBA will automatically split it into bills and coins.

7. Rolling Average Table

Create a rolling average table that updates with a new value. Place a command button on your worksheet and add the following code to generate random numbers and update the rolling average:

Range("B3").Value = WorksheetFunction.RandBetween(0, 100)

Rolling Average Table in Excel VBA

Then, configure the Worksheet Change Event:

  • Open the Visual Basic Editor.
  • Double-click on “Sheet1” in the Project Explorer.
  • Choose “Worksheet” from the left drop-down list.
  • Select “Change” from the right drop-down list.
Dim newValue As Integer, firstFourValues As Range, lastFourValues As Range

If Target.Address = "$B$3" Then
    newValue = Range("B3").Value
    Set firstFourValues = Range("D3:D6")
    Set lastFourValues = Range("D4:D7")

    lastFourValues.Value = firstFourValues.Value
    Range("D3").Value = newValue
End If

Now, every time you change the value in cell B3, the rolling average table updates accordingly.

These Excel VBA events are powerful tools for automating your spreadsheets and improving your efficiency. By responding to user actions and workbook events, you can create dynamic and responsive Excel applications that save time and reduce errors in your work.
Mastering Loops in VBA Macros for Excel

Introduction:

Loops are an essential component of Excel VBA (Visual Basic for Applications), enabling you to automate repetitive tasks and work with data efficiently. In this guide, we’ll explore various types of loops and how to use them effectively in Excel VBA.

Single Loop:

A single loop is used to iterate through a one-dimensional range of cells. Let’s start by placing a command button on your worksheet and adding the following code:

Dim i As Integer

For i = 1 To 6
    Cells(i, 1).Value = 100
Next i

Result: This loop executes six times, filling column A with the value 100. Proper indentation enhances code readability.

Double Loop:

Double loops are employed to loop through two-dimensional cell ranges. Add this code to a command button:

Dim i As Integer, j As Integer

For i = 1 To 6
    For j = 1 To 2
        Cells(i, j).Value = 100
    Next j
Next i

Result: This loop covers various combinations of ‘i’ and ‘j,’ entering 100 in corresponding cells. Each ‘i’ value iterates through ‘j’ values.

Triple Loop:

For multi-sheet work, use a triple loop to navigate two-dimensional ranges on multiple worksheets. Add this code:

Dim c As Integer, i As Integer, j As Integer

For c = 1 To 3
    For i = 1 To 6
        For j = 1 To 2
            Worksheets(c).Cells(i, j).Value = 100
        Next j
    Next i
Next c

Result: This loop, similar to the double loop, adds 100 to cells on three different sheets.

Do While Loop:

Besides the ‘For Next’ loop, Excel VBA provides other loops like the ‘Do While’ loop. The code below continues until the specified condition is met:

Dim i As Integer
i = 1

Do While i < 6
    Cells(i, 1).Value = 20
    i = i + 1
Loop

Result: As long as ‘i’ is less than 6, the loop sets cell values to 20. Use ‘Do While’ when the number of iterations is unknown.

Dim i As Integer
i = 1

Do While Cells(i, 1).Value <> ""
    Cells(i, 2).Value = Cells(i, 1).Value + 10
    i = i + 1
Loop

Result: This loop operates as long as column A cells are not empty, incrementing column B values by 10.

Loop Through Defined Range:

Use a loop to process a specific range. In this case, we square each cell in a predefined range:

Dim rng As Range, cell As Range
Set rng = Range("A1:A3")

For Each cell In rng
    cell.Value = cell.Value * cell.Value
Next cell

Result: This loop squares values in the defined range.

Loop Entire Column:

To manipulate an entire column, use a loop like this:

Dim i As Long

For i = 1 To Rows.Count
    If Cells(i, 1).Value < Range("D2").Value And Not IsEmpty(Cells(i, 1).Value) Then
        Cells(i, 1).Font.Color = vbRed
    End If
Next i

Result: This loop changes font color to red for values in column A that are lower than the value in cell D2.

Do Until Loop:

The ‘Do Until’ loop runs until the specified condition is met. For instance:

Dim i As Integer
i = 1

Do Until i > 6
    Cells(i, 1).Value = 20
    i = i + 1
Loop

Result: The loop keeps running until ‘i’ exceeds 6, setting cell values to 20.

Step Keyword:

Use the ‘Step’ keyword to define a different increment for the counter variable. For example, a step of 2:

Dim i As Integer

For i = 1 To 6 Step 2
    Cells(i, 1).Value = 100
Next i

Result: The loop increases ‘i’ by 2 during each iteration, allowing you to skip values.

Dim j As Integer

For j = 8 To 3 Step -1
    Cells(6, j).Value = 50
Next j

Result: This loop decrements ‘j’ by 1 in each iteration.

Create Patterns:

Generate patterns by combining loops, like this checkerboard pattern:

Dim i As Integer, j As Integer

For i = 1 To 5 Step 2
    For j = 1 To 5 Step 2
        Cells(i, j).Interior.ColorIndex = 15
        Cells(i, j).Offset(1, 1).Interior.ColorIndex = 15
    Next j
Next i

Result: This loop creates a visually appealing checkerboard pattern.

Sort Numbers:

Sorting numbers is a common task. This code demonstrates sorting numbers in ascending order:

Dim i As Integer, j As Integer, temp As Integer, rng As Range

Set rng = Range("A1").CurrentRegion

For i = 1 To rng.Count
    For j = i + 1 To rng.Count
        If rng.Cells(j) < rng.Cells(i) Then
            temp = rng.Cells(i)
            rng.Cells(i) = rng.Cells(j)
            rng.Cells(j) = temp
        End If
    Next j
Next i

Result: This loop sorts numbers in ascending order.

Randomly Sort Data:

Randomly sorting data, such as names, can be useful. Here’s a program that randomly sorts names using Excel’s RANDBETWEEN function:

Dim tempString As String, tempInteger As Integer, i As Integer, j As Integer

For i = 1 To 5
    Cells(i, 2).Value = WorksheetFunction.RandBetween(0, 1000)
Next i

For i = 1 To 5
    For j = i + 1 To 5
        If Cells(j, 2).Value < Cells(i, 2).Value Then
            tempString = Cells(i, 1).Value
            Cells(i, 1).Value = Cells(j, 1).Value
            Cells(j, 1).Value = tempString

            tempInteger = Cells(i, 2).Value
            Cells(i, 2).Value = Cells(j, 2).Value
            Cells(j, 2).Value = tempInteger
        End If
    Next j
Next i

Result: This loop randomly sorts names based on their associated numbers.

Remove Duplicates:

Remove duplicate numbers from a list and store unique values in another column:

Dim toAdd As Boolean, uniqueNumbers As Integer, i As Integer, j As Integer

Cells(1, 2).Value = Cells(1, 1).Value
uniqueNumbers = 1
toAdd = True

For i = 2 To 10
    For j = 1 To uniqueNumbers
        If Cells(i, 1).Value = Cells(j, 2).Value Then
            toAdd = False
        End If
    Next j

    If toAdd = True Then
        Cells(uniqueNumbers + 1, 2).Value = Cells(i, 1).Value
        uniqueNumbers = uniqueNumbers + 1
    End If

    toAdd = True
Next i

Result: This loop eliminates duplicates and keeps only unique numbers.

Conclusion: Mastering loops in Excel VBA is crucial for automating tasks, working with data, and improving efficiency. Understanding the different loop types and their applications empowers you to tackle a wide range of tasks in your Excel workbooks. With practice and creativity, you can harness the power of loops to streamline your data processing and analysis.

Mastering Excel VBA Basics: Practical Applications

Introduction:

In the world of Excel VBA, understanding the fundamentals is essential. In this guide, we’ll explore practical applications of key Excel VBA concepts, including finding the second-highest value, summing values by color, deleting blank cells, and swapping values. These examples will provide a solid foundation for your Excel automation journey.

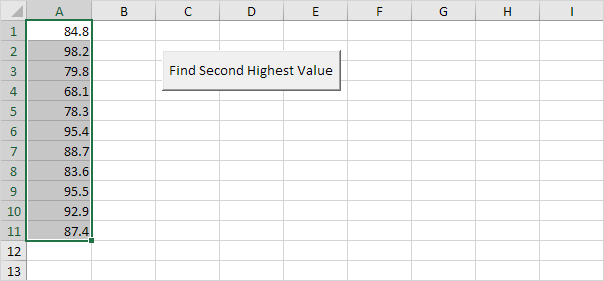
Finding the Second-Highest Value:

  • Scenario: You have a list of numbers, and you want to find the second-highest value.

Code:

Dim rng As Range, cell As Range
Dim highestValue As Double, secondHighestValue As Double

Set rng = Selection
highestValue = 0
secondHighestValue = 0

' Find Highest Value
For Each cell In rng
If cell.Value > highestValue Then highestValue = cell.Value
Next cell

' Find Second Highest Value
For Each cell In rng
If cell.Value > secondHighestValue And cell.Value < highestValue Then
secondHighestValue = cell.Value
End If
Next cell

MsgBox "Second Highest Value is " & secondHighestValue

Find Second Highest Value in Excel VBA

  • Result: This code will display the second-highest value found in the selected range.

Find Second Highest Value Result

Summing Values by Color:

  • Scenario: You’ve lent money to people, and you want to calculate how much money you still need to receive from those who owe you. Owing money is indicated by red font color.

Code:

Dim toReceive As Integer, i As Integer
toReceive = 0

For i = 1 To 12
If Cells(i, 1).Font.Color = vbRed Then
toReceive = toReceive + Cells(i, 1).Value
End If
Next i

Sum by Color in Excel VBA

  • Result: This code calculates and displays the total amount of money you’re yet to receive.

Sum by Color Result

Deleting Blank Cells:

  • Scenario: You want to remove blank cells from a range, shifting the non-blank cells to fill the gaps.

Code:

Dim counter As Integer, i As Integer
counter = 0

For i = 1 To 10
If Cells(i, 1).Value <> "" Then
Cells(counter + 1, 2).Value = Cells(i, 1).Value
counter = counter + 1
End If
Next i

Range("A1:A10").Value = ""
Range("A1:A10").Value = Range("B1:B10").Value
Range("B1:B10") = ""

Delete Blank Cells in Excel VBA

  • Result: This code deletes the blank cells in column A and shifts non-blank cells up.

Delete Blank Cells Result

Swapping Values:

  • Scenario: You want to swap the values of two cells in Excel.

Code:

Dim temp As Double
temp = Range("A1").Value
Range("A1").Value = Range("B1").Value
Range("B1").Value = temp

Swap Values in Excel VBA
  • Result: This code swaps the values of cells A1 and B1.
Swap Values Result

Conclusion:

Understanding these practical applications of Excel VBA fundamentals provides a solid basis for your Excel automation journey. Whether you need to find specific values, perform calculations, or manipulate cell contents, VBA can streamline your work. With this knowledge, you’ll be well-prepared to tackle various automation tasks in Excel, enhancing your productivity and efficiency.

Mastering Range Objects in Excel VBA

Mastering Range Objects in Excel VBA

The Range object is a powerhouse in Excel VBA, and understanding its properties and methods is essential for effective VBA programming. In this comprehensive guide, we’ll delve into the versatility of Range objects and how they can be harnessed to perform a variety of tasks in Excel.

Range Object Basics

The Range object is the representation of a cell or cells on your worksheet and is the cornerstone of Excel VBA. Let’s explore its properties and methods, which are crucial for manipulating data.

Examples of Range Usage:

  • Setting values to a specific cell:

Code:

Range("B3").Value = 2

Excel VBA Range Example

  • Setting values to a range of cells:

Code:

Range("A1:A4").Value = 5

Range Example

  • Setting values to non-contiguous ranges:

Code:

Range("A1:A2,B3:C4").Value = 10

Range Example

Working with Cells

While the Range object is powerful, you can also achieve specific cell interactions using the Cells property.

  • Set the value of a specific cell:

Code:

Cells(3, 2).Value = 2

Cells in Excel VBA

  • Copy data from one range to another:

Code:

Range("C3:C4").Value = Range("A1:A2").Value

Declaring a Range Object

In Excel VBA, declaring a Range object is a common practice for efficient coding.

Code:

Dim example As Range

Set example = Range("A1:C4")

example.Value = 8

Declare a Range Object in Excel VBA

Selecting Ranges

The Select method is useful for interacting with specific ranges in your code.

Code:

Dim example As Range

Set example = Range("A1:C4")

example.Select

Select Method

Rows and Columns

You can work with entire rows and columns with Excel VBA, simplifying your tasks.

  • Selecting the second column:

Code:

Columns(2).Select

  • Selecting the seventh row:

Code:

Rows(7).Select

Copying and Clearing Ranges

Copying and clearing data can be done using the Copy, Paste, Clear, and ClearContents methods.

  • Copying and pasting data:

Code:

Range("A1:A2").Select

Selection.Copy

Range("C3").Select

ActiveSheet.Paste

  • Clearing content from a cell:

Code:

Range("A1").ClearContents

Understanding CurrentRegion

The CurrentRegion property defines a range bounded by any combination of blank rows and columns.

  • Find the CurrentRegion of cell A1:

Code:

Range("A1").CurrentRegion.Select

Current region of cell A1

  • Find the CurrentRegion of cell B3:

Code:

Range("B3").CurrentRegion.Select

Current region of cell B3

Dynamic Range and Coloring Max Value

This code snippet demonstrates coloring the maximum value in a dynamic range.

Code:

' Insert your dynamic range
Dim rng As Range
Set rng = Range("A1:A10")

' Find the maximum value in the range
maximum = WorksheetFunction.Max(rng)

' Color the maximum value
For Each cell In rng
If cell.Value = maximum Then cell.Interior.ColorIndex = 22
Next cell

Dynamic Range Result

Resizing Ranges with Resize

The Resize property allows you to make a range larger or smaller by specifying the number of rows and columns.

Code:

Range("A1:C4").Resize(3, 2).Select

Excel VBA Resize Property Result

Code:

Range("A1:C4").Resize(, 1).Select

Excel VBA Resize Property Result

Union and Intersect Methods

The Union and Intersect methods enable you to work with multiple ranges at once.

  • Union of two ranges:

Code:

Union(Range("B2:C7"), Range("C6:F8")).Select

Union Of Two Ranges

  • Intersect of two ranges:

Code:

Intersect(Range("B2:C7"), Range("C6:F8")).Select

Union Of Two Ranges

Testing a Selection

You can test a selection in Excel VBA using Count, IsNumeric, IsEmpty, and Intersect.

Test a Selection in Excel VBA

Working with the Areas Collection:

Counting Areas:To determine the number of areas within a given range, use the Areas.Count property.

Code:

Dim rangeToUse As Range
Set rangeToUse = Range("B2:C3,C5:E5")
MsgBox rangeToUse.Areas.Count

Areas Collection in Excel VBA

  • Result: This code will display the count of areas within the specified range.

Count Areas

Accessing Specific Areas:You can access specific areas within a range by using index values. The following code counts the number of cells in the first area.

Code:

MsgBox rangeToUse.Areas(1).Count

  • Result: This code displays the count of cells in the first area of the range.

Count Cells, First Area

Looping Through Areas:To process each area in a range and count the cells in each area, you can use a loop. The following code does just that:

Code:

Dim singleArea As Range
For Each singleArea In rangeToUse.Areas
MsgBox singleArea.Count
Next singleArea

  • Result: This code will display the count of cells in each area of the range.

Count Cells, First Area

Count Cells, Second Area

Comparing Ranges:

Scenario:You have randomly selected ranges, and you want to highlight cells that contain unique values. This code will help identify values that only appear once across all selected ranges.

Code:

Dim rangeToUse As Range, singleArea As Range, cell1 As Range, cell2 As Range, i As Integer, j As Integer

Set rangeToUse = Selection
Cells.Interior.ColorIndex = 0
Cells.Borders.LineStyle = xlNone

If Selection.Areas.Count <= 1 Then
MsgBox "Please select more than one area."
Else
rangeToUse.Interior.ColorIndex = 38
For Each singleArea In rangeToUse.Areas
singleArea.BorderAround ColorIndex:=1, Weight:=xlThin
Next singleArea
For i = 1 To rangeToUse.Areas.Count
For j = i + 1 To rangeToUse.Areas.Count
For Each cell1 In rangeToUse.Areas(i)
For Each cell2 In rangeToUse.Areas(j)
If cell1.Value = cell2.Value Then
cell1.Interior.ColorIndex = 0
cell2.Interior.ColorIndex = 0
End If
Next cell2
Next cell1
Next j
Next i
End If

Compare Ranges in Excel VBA

  • Result: This code will highlight unique values in the selected ranges while removing the highlighting for non-unique values.

Compare Ranges Result

Mastering Offset Property:

The Offset property is a powerful tool in Excel VBA, enabling you to navigate to specific cells relative to a starting point. Let’s explore its applications:

Moving Relative to a Range:

Code:

Dim example As Range
Set example = Range("A1:A2")
example.Offset(3, 2).Select

Excel VBA Offset Property Result

Result: These code lines select the range that is 3 rows below and 2 columns to the right of Range(“A1:A2”). Remember that Offset always takes the top left cell of a range as the starting point.

From Active Cell to Last Entry:

The End property is a valuable asset in Excel VBA, especially when you need to find the last entry in a column. Let’s see how it works:

Selecting the Last Entry in a Column:

Code:

Range("A5").End(xlDown).Select

Last Entry

Note: You can use various starting points such as Range(“A1”) or Range(“A2”). This code line is equivalent to pressing the END+DOWN ARROW.

Result: The last entry in the column is selected.

Selecting a Range to the Last Entry:

Code:

Range(Range("A5"), Range("A5").End(xlDown)).Select

From Cell A5 to Last Entry

Result: This code line selects the range from cell A5 to the last entry in the column.

Selecting from the Active Cell to the Last Entry:

Code:

ange(ActiveCell, ActiveCell.End(xlDown)).Select 

From Active Cell to Last Entry Result

Result: When you select any cell, this code line chooses the range from the active cell down to the last entry in the column.

You’re not limited to moving down; you can use constants like xlUp, xlToRight, and xlToLeft to navigate in other directions, allowing for versatile and precise selections.

Final Thoughts

Mastering Range objects is crucial for proficient Excel VBA programming. These objects empower you to manipulate data with precision and flexibility, making your Excel tasks more efficient and automated. These skills are invaluable for handling complex data analysis tasks with ease.