Understanding VBA Functions and Subroutines in Excel

In Excel VBA, functions and subroutines are essential tools for automating tasks and processing data. Let’s explore the key differences between these two constructs and see how they can be used effectively to streamline your VBA code.

Function

A function in Excel VBA is a versatile tool that performs a task and returns a value. It’s perfect for situations where you need a specific result. Here’s how to create a function:

  1. Open the Visual Basic Editor by clicking Insert > Module.
  2. Define your function, giving it a name and specifying its arguments and return type. For example:
Function Area(x As Double, y As Double) As Double
    Area = x * y
End Function

  1. You can now use this function in your code to calculate values. For example:
Dim z As Double
z = Area(3, 5) + 2
MsgBox z

Result: When you click the command button, it displays the result “17” in a message box.

Excel VBA Function Result

Subroutine (Sub)

A subroutine in Excel VBA is designed for performing actions without returning a value. Here’s how to create a subroutine:

  1. Open the Visual Basic Editor by clicking Insert > Module.
  2. Define your subroutine, specifying its arguments. For example:
Sub Area(x As Double, y As Double)
    MsgBox x * y
End Sub

  1. You can call this subroutine from your code to perform actions. For example:
Area 3, 5

Result: Click the command button to see a message box displaying the result “15”. Subroutines don’t return values.

Excel VBA Sub Result

User Defined Function (UDF)

User Defined Functions (UDFs) are custom functions you can create in Excel VBA. They are particularly useful when built-in Excel functions aren’t sufficient. Let’s create a UDF called SUMEVENNUMBERS to sum even numbers in a given range.

  1. Open the Visual Basic Editor by clicking Insert > Module.
  2. Define the UDF, specifying its arguments. For example:
Function SUMEVENNUMBERS(rng As Range) As Double

User Defined Function in Excel VBA
  1. Within the UDF, declare variables and set up a loop to check each cell in the provided range.
Dim cell As Range
For Each cell In rng

  1. Calculate the sum of even numbers and the count of even numbers in the range.
    If cell.Value Mod 2 = 0 Then
        SUMEVENNUMBERS = SUMEVENNUMBERS + cell.Value
    End If
Next cell

  1. End the UDF.
End Function

  1. You can now use this custom function in Excel, just like any other function, to find the sum of even numbers in a range.
User Defined Function Result

Custom Average Function

Let’s create another UDF, a custom average function that calculates the average of values in a range, excluding outliers.

  1. Open the Visual Basic Editor by clicking Insert > Module.
  2. Define the UDF, specifying its arguments. For example:
Function CUSTOMAVERAGE(rng As Range, lower As Integer, upper As Integer) As Double

Custom Average Function in Excel VBA
  1. Declare variables and set up a loop to check each cell in the provided range.
Dim cell As Range, total As Integer, count As Integer
For Each cell In rng

  1. Calculate the average by excluding values outside the specified range.
    If cell.Value >= lower And cell.Value <= upper Then
        total = total + cell.Value
        count = count + 1
    End If
Next cell

  1. Calculate the custom average and end the UDF.
CUSTOMAVERAGE = total / count
End Function

  1. You can use this custom average function to calculate averages, excluding specified outliers.
Custom Average Function Check

Volatile Functions

By default, UDFs in Excel VBA are not volatile. They recalculate only when one of their arguments changes. If you need a function to recalculate every time any cell on the worksheet is recalculated, you can make it volatile.

To make a UDF volatile, you can use the Application.Volatile statement within the UDF.

ByRef and ByVal

In Excel VBA, you can pass arguments to a procedure (function or sub) by reference (ByRef) or by value (ByVal). By default, VBA passes arguments by reference.

Here’s an example to illustrate the difference between ByRef and ByVal:

Dim x As Integer
x = 10

MsgBox Triple(x)
MsgBox x

In the module:

Function Triple(ByRef x As Integer) As Integer
    x = x * 3
    Triple = x
End Function

Result: The second MsgBox" displays a value of 30 because the original value of x"was changed within the function.

ByRef Result

To pass arguments by value, modify the function like this:

Function Triple(ByVal x As Integer) As Integer
    x = x * 3
    Triple = x
End Function

ByVal Result

Result: The second MsgBox" displays a value of 10 because the original value of x" remains unchanged.

Understanding how to use functions, subroutines, UDFs, and arguments passed by reference or by value is crucial for efficient VBA programming in Excel.

Excel VBA Macros: Mastering Arrays for Efficient Data Handling

Arrays are the unsung heroes of Excel VBA, offering a powerful way to manage data efficiently. In this guide, we’ll explore the world of arrays, from one-dimensional structures to dynamic arrays and user-defined functions, unlocking their potential for handling data.

One-dimensional Array

Create one-dimensional arrays effortlessly with these steps:

  1. Open the Visual Basic Editor.
  2. Place a command button on your worksheet and add the following code lines:
Dim Films(1 To 5) As String

Films(1) = "Lord of the Rings"
Films(2) = "Speed"
Films(3) = "Star Wars"
Films(4) = "The Godfather"
Films(5) = "Pulp Fiction"

MsgBox Films(4)

Result: When you click the command button, you’ll see “The Godfather” displayed in a message box.

Element of a One-dimensional Array in Excel VBA

Two-dimensional Array

If you’re dealing with two-dimensional data, follow these steps:

  1. Open the Visual Basic Editor.
  2. Place a command button on your worksheet and add the following code lines:
Dim Films(1 To 5, 1 To 2) As String
Dim i As Integer, j As Integer

For i = 1 To 5
    For j = 1 To 2
        Films(i, j) = Cells(i, j).Value
    Next j
Next i

MsgBox Films(4, 2)

Result: Click the command button to display an element from the array.

Element of a Two-dimensional Array in Excel VBA

Dynamic Array

When you need arrays that can change size dynamically, use the ReDim keyword:

  1. Open the Visual Basic Editor.
  2. Place a command button on your worksheet and add the following code lines:
Dim numbers() As Integer, size As Integer, i As Integer

size = WorksheetFunction.CountA(Worksheets(1).Columns(1))
ReDim numbers(size)

For i = 1 To size
    numbers(i) = Cells(i, 1).Value
Next i

MsgBox numbers(size)

Dynamic Array in Excel VBA

Result: Your dynamic array adapts to the size of your data.

Last Element of the Array

Array Function

Use the Array function to initialize an array efficiently:

  1. Open the Visual Basic Editor.
  2. Place a command button on your worksheet and add the following code lines:
Dim departments As Variant

departments = Array("Sales", "Production", "Logistics")

MsgBox departments(0) ' Default array indexing

Result: You’ll see the first element, “Sales,” in a message box.

Array Function Result

User Defined Function

Create a User Defined Function (UDF) to return month names using the Array function:

  1. Open the Visual Basic Editor and insert a module.
  2. Add the following code:
Function MONTHNAMES()
    MONTHNAMES = Array("Jan", "Feb", "Mar", "Apr", "May", "Jun", "Jul", "Aug", "Sep", "Oct", "Nov", "Dec")
End Function

Result: You can use the function =MONTHNAMES() to get the month names.

Month Names in Excel VBA

Size of an Array

Determine the size of an array in Excel VBA using UBound and LBound:

  1. Open the Visual Basic Editor.
  2. Place a command button on your worksheet and add the following code lines:
Dim Films(1 To 5, 1 To 2) As String, x As Integer, y As Integer

x = UBound(Films, 1) - LBound(Films, 1) + 1
y = UBound(Films, 2) - LBound(Films, 2) + 1

MsgBox "This array consists of " & x * y & " elements"

Size of an Array in Excel VBA

Result: The message box shows the total number of array elements.

Size of an Array Result

Mastering arrays is essential for effective data handling in Excel VBA. Whether you’re working with one-dimensional or two-dimensional data, dynamic arrays, or creating custom functions, arrays are your key to efficient data management.

Mastering Excel VBA Events: Automating Your Spreadsheets

Excel VBA (Visual Basic for Applications) empowers you to take control of your spreadsheets by automating various tasks. One of the key features of Excel VBA is its ability to respond to events, which are user actions or occurrences in the Excel environment. In this tutorial, we’ll explore several essential Excel VBA events and how you can use them to streamline your work. Let’s dive in.

1. Workbook Open Event

The Workbook Open Event allows you to execute code when you open a workbook. To use this event:

  • Open the Visual Basic Editor.
  • Double-click on “ThisWorkbook” in the Project Explorer.
  • Choose “Workbook” from the left drop-down list.
  • Choose “Open” from the right drop-down list.

Add the following code to the Workbook Open Event:

MsgBox "Good Morning"

Workbook Open Event Result

Save, close, and then reopen the Excel file. You’ll see a “Good Morning” message.

2. Worksheet Change Event

The Worksheet Change Event triggers when you change a cell in a worksheet. To set it up:

  • Open the Visual Basic Editor.
  • Double-click on a sheet (e.g., “Sheet1”) in the Project Explorer.
  • Choose “Worksheet” from the left drop-down list.
  • Choose “Change” from the right drop-down list.

Here’s an example of how to react to changes in cell B2:

If Target.Address = "$B$2" Then
    If Target.Value > 80 Then
        MsgBox "Goal Completed"
    End If
End If

Workbook Change Event Result

When you enter a value greater than 80 in cell B2, a message will appear.

3. BeforeDoubleClick Event

This event runs when you double-click a cell. Follow these steps:

  • Open the Visual Basic Editor.
  • Double-click on a sheet (e.g., “Sheet1”) in the Project Explorer.
  • Choose “Worksheet” from the left drop-down list.
  • Select “BeforeDoubleClick” from the right drop-down list.

Use this code to change the font color and cancel the default double-click action (cell edit mode):

Target.Font.Color = vbRed
Cancel = True

Worksheet BeforeDoubleClick Event Result

When you double-click a cell, it will turn red, and you won’t enter edit mode.

4. Highlight Active Cell

This feature highlights the row and column of the active cell. Implement it as follows:

  • Open the Visual Basic Editor.
  • Double-click on the sheet (e.g., “Sheet1”) in the Project Explorer.
  • Choose “Worksheet” from the left drop-down list.
  • Select “SelectionChange” from the right drop-down list.

Add this code:

Dim rowNumberValue As Integer, columnNumberValue As Integer, i As Integer, j As Integer

Cells.Interior.ColorIndex = 0

rowNumberValue = ActiveCell.Row
columnNumberValue = ActiveCell.Column

For i = 1 To rowNumberValue
    Cells(i, columnNumberValue).Interior.ColorIndex = 37
Next i

For j = 1 To columnNumberValue
    Cells(rowNumberValue, j).Interior.ColorIndex = 37
Next j

Highlight Active Cell in Excel VBA

Now, each time you change the active cell on Sheet1, the corresponding row and column will turn blue.

5. Create a Footer Before Printing

You can use this event to add a footer before printing your workbook. Follow these steps:

  • Open the Visual Basic Editor.
  • Double-click on “ThisWorkbook” in the Project Explorer.
  • Choose “Workbook” from the left drop-down list.
  • Choose “BeforePrint” from the right drop-down list.

Use this code to create a left footer with the workbook’s full name:

ActiveSheet.PageSetup.LeftFooter = ActiveWorkbook.FullName

Footer

This will set the left footer of the printed document to the full name of your workbook.

6. Bills and Coins

This event helps you split an amount of money into bills and coins. Configure it this way:

  • Open the Visual Basic Editor.
  • Double-click on the sheet (e.g., “Sheet1”) in the Project Explorer.
  • Choose “Worksheet” from the left drop-down list.
  • Select “Change” from the right drop-down list.

Insert this code to handle the amount splitting:

Dim amount As Double, i As Integer

If Target.Address = "$B$2" Then
    amount = Range("B2").Value
    Range("B5:B16").Value = ""
    
    For i = 5 To 16
        Do While amount >= Cells(i, 1).Value
            Cells(i, 2).Value = Cells(i, 2).Value + 1
            amount = amount - Cells(i, 1).Value
        Loop
    Next i
End If

Bills and Coins Result

Now, when you change the value in cell B2 on Sheet1, Excel VBA will automatically split it into bills and coins.

7. Rolling Average Table

Create a rolling average table that updates with a new value. Place a command button on your worksheet and add the following code to generate random numbers and update the rolling average:

Range("B3").Value = WorksheetFunction.RandBetween(0, 100)

Rolling Average Table in Excel VBA

Then, configure the Worksheet Change Event:

  • Open the Visual Basic Editor.
  • Double-click on “Sheet1” in the Project Explorer.
  • Choose “Worksheet” from the left drop-down list.
  • Select “Change” from the right drop-down list.
Dim newValue As Integer, firstFourValues As Range, lastFourValues As Range

If Target.Address = "$B$3" Then
    newValue = Range("B3").Value
    Set firstFourValues = Range("D3:D6")
    Set lastFourValues = Range("D4:D7")

    lastFourValues.Value = firstFourValues.Value
    Range("D3").Value = newValue
End If

Now, every time you change the value in cell B3, the rolling average table updates accordingly.

These Excel VBA events are powerful tools for automating your spreadsheets and improving your efficiency. By responding to user actions and workbook events, you can create dynamic and responsive Excel applications that save time and reduce errors in your work.

Mastering Date and Time Manipulation in Excel VBA

Introduction:

In this comprehensive guide, we will delve into the world of Excel VBA to master date and time manipulation. Whether you’re a beginner or an experienced VBA user, you’ll find valuable insights and practical examples to help you work with dates and times effectively. From simple tasks like extracting year, month, and day from a date to more complex challenges like sorting birthdays by month and day, this guide covers it all.

1. Year, Month, Day of a Date

This topic covers extracting year, month, and day components from a date using VBA.

VBA Code Example:

Sub ExtractDateComponents()
    Dim exampleDate As Date
    exampleDate = DateValue("Jun 19, 2010")
    
    Dim yearValue As Integer
    yearValue = Year(exampleDate)
    
    Dim monthValue As Integer
    monthValue = Month(exampleDate)
    
    Dim dayValue As Integer
    dayValue = Day(exampleDate)
    
    ' Display the results in a worksheet
    Range("A1").Value = "Year"
    Range("A2").Value = yearValue
    Range("B1").Value = "Month"
    Range("B2").Value = monthValue
    Range("C1").Value = "Day"
    Range("C2").Value = dayValue
End Sub

2. DateAdd

DateAdd is used to add or subtract days, months, or years to a date.

VBA Code Example:

Sub AddDaysToDate()
    Dim firstDate As Date
    firstDate = DateValue("Jun 19, 2010")
    
    Dim numberOfDays As Integer
    numberOfDays = 3
    
    Dim secondDate As Date
    secondDate = DateAdd("d", numberOfDays, firstDate)
    
    ' Display the result in a worksheet
    Range("A1").Value = "Original Date"
    Range("A2").Value = firstDate
    Range("B1").Value = "Date After Adding 3 Days"
    Range("B2").Value = secondDate
End Sub

3. Current Date and Time

This topic explains how to get the current date and time.

VBA Code Example:

Sub GetCurrentDateTime()
    Dim currentDateTime As Date
    currentDateTime = Now()
    
    ' Display the current date and time in a worksheet
    Range("A1").Value = "Current Date and Time"
    Range("A2").Value = currentDateTime
End Sub

4. Hour, Minute, Second

This topic demonstrates extracting the hour, minute, and second from a date-time value.

VBA Code Example:

Sub ExtractTimeComponents()
    Dim currentTime As Date
    currentTime = Now()
    
    Dim hourValue As Integer
    hourValue = Hour(currentTime)
    
    Dim minuteValue As Integer
    minuteValue = Minute(currentTime)
    
    Dim secondValue As Integer
    secondValue = Second(currentTime)
    
    ' Display the results in a worksheet
    Range("A1").Value = "Hour"
    Range("A2").Value = hourValue
    Range("B1").Value = "Minute"
    Range("B2").Value = minuteValue
    Range("C1").Value = "Second"
    Range("C2").Value = secondValue
End Sub

5. TimeValue

TimeValue converts a time string to a time serial number.

VBA Code Example:

Sub ConvertTimeValue()
    Dim timeStr As String
    timeStr = "9:20:01 AM"
    
    Dim timeSerial As Date
    timeSerial = TimeValue(timeStr)
    
    ' Display the time serial number in a worksheet
    Range("A1").Value = "Time String"
    Range("A2").Value = timeStr
    Range("B1").Value = "Time Serial Number"
    Range("B2").Value = timeSerial
End Sub

6. Compare Dates and Times

In VBA, comparing dates and times can be done using standard comparison operators. Here’s an example that compares two dates:

VBA Code Example:

Sub CompareDates()
    Dim date1 As Date
    Dim date2 As Date
    
    date1 = DateValue("10/15/2023")
    date2 = DateValue("10/16/2023")
    
    If date1 < date2 Then
        MsgBox "date1 is earlier than date2"
    ElseIf date1 > date2 Then
        MsgBox "date1 is later than date2"
    Else
        MsgBox "date1 and date2 are the same"
    End If
End Sub

7. DateDiff Function

The DateDiff function calculates the difference between two dates in various date parts. Here’s an example that calculates the number of days between two dates:

VBA Code Example:

Sub CalculateDateDifference()
    Dim firstDate As Date
    Dim secondDate As Date
    Dim daysDifference As Long
    
    firstDate = DateValue("10/15/2023")
    secondDate = DateValue("10/25/2023")
    
    daysDifference = DateDiff("d", firstDate, secondDate)
    
    MsgBox "Number of days between the two dates: " & daysDifference
End Sub

8. Weekdays

Counting weekdays between two dates is a common task. Here’s an example that counts weekdays between two dates (excluding weekends):

VBA Code Example:

Sub CountWeekdays()
    Dim startDate As Date
    Dim endDate As Date
    Dim currentDate As Date
    Dim weekdayCount As Integer
    
    startDate = DateValue("10/1/2023")
    endDate = DateValue("10/15/2023")
    weekdayCount = 0
    
    currentDate = startDate
    
    Do While currentDate <= endDate
        If Weekday(currentDate) >= 2 And Weekday(currentDate) <= 6 Then
            ' Weekday() returns a value between 2 (Monday) and 6 (Friday)
            weekdayCount = weekdayCount + 1
        End If
        currentDate = currentDate + 1 ' Move to the next day
    Loop
    
    MsgBox "Number of weekdays between the two dates: " & weekdayCount
End Sub

9. Delay a Macro

Scheduling a macro to run after a specific time delay can be achieved using Application.OnTime. Here’s an example:

VBA Code Example:

Sub ScheduleMacro()
    Dim runTime As Date
    runTime = Now + TimeValue("00:00:05") ' Schedule to run 5 seconds from now
    
    Application.OnTime runTime, "YourMacroToRun"
End Sub

Sub YourMacroToRun()
    MsgBox "This macro was executed after a 5-second delay."
End Sub

10. Sort Birthdays

Sorting birthdays based on months and days while ignoring the year can be accomplished using various sorting algorithms. Below is a simplified example of sorting a list of birthdays in Excel using the Bubble Sort algorithm:

VBA Code Example:

Sub BubbleSortBirthdays()
    Dim birthdaysRange As Range
    Set birthdaysRange = Worksheets("Sheet1").Range("A2:A13") ' Assuming the birthdays are in A2:A13
    
    Dim i As Long, j As Long
    Dim tempDate As Date, tempName As String
    
    For i = 1 To birthdaysRange.Rows.Count - 1
        For j = i + 1 To birthdaysRange.Rows.Count
            If CDate(birthdaysRange.Cells(i, 1).Value) > CDate(birthdaysRange.Cells(j, 1).Value) Then
                tempDate = CDate(birthdaysRange.Cells(i, 1).Value)
                birthdaysRange.Cells(i, 1).Value = birthdaysRange.Cells(j, 1).Value
                birthdaysRange.Cells(j, 1).Value = tempDate
                
                tempName = birthdaysRange.Cells(i, 1).Offset(0, 1).Value
                birthdaysRange.Cells(i, 1).Offset(0, 1).Value = birthdaysRange.Cells(j, 1).Offset(0, 1).Value
                birthdaysRange.Cells(j, 1).Offset(0, 1).Value = tempName
            End If
        Next j
    Next i
End Sub

This code assumes the birthdays are in column A, and the corresponding names are in column B. It sorts the list of birthdays based on the dates while keeping the names aligned with their respective dates.

I hope these additional code examples help in understanding these topics better.

By understanding and using these Date and Time operations in VBA, you can effectively manage and manipulate date-time data within your Excel worksheets and automate various tasks related to dates and times.

These are examples of common date and time operations in VBA, including comparing dates, finding date differences, counting weekdays, delaying macros, and sorting birthdays based on dates. You can run these VBA code examples in Excel for practical use.

Mastering Excel VBA Basics: Practical Applications

Introduction:

In the world of Excel VBA, understanding the fundamentals is essential. In this guide, we’ll explore practical applications of key Excel VBA concepts, including finding the second-highest value, summing values by color, deleting blank cells, and swapping values. These examples will provide a solid foundation for your Excel automation journey.

Finding the Second-Highest Value:

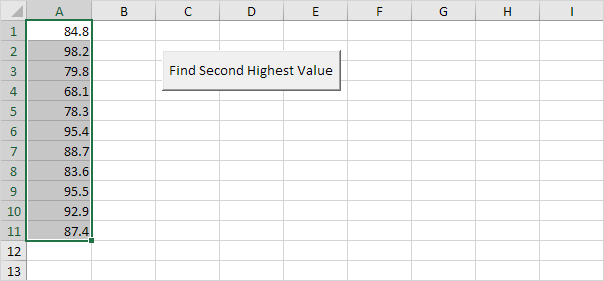
  • Scenario: You have a list of numbers, and you want to find the second-highest value.

Code:

Dim rng As Range, cell As Range
Dim highestValue As Double, secondHighestValue As Double

Set rng = Selection
highestValue = 0
secondHighestValue = 0

' Find Highest Value
For Each cell In rng
If cell.Value > highestValue Then highestValue = cell.Value
Next cell

' Find Second Highest Value
For Each cell In rng
If cell.Value > secondHighestValue And cell.Value < highestValue Then
secondHighestValue = cell.Value
End If
Next cell

MsgBox "Second Highest Value is " & secondHighestValue

Find Second Highest Value in Excel VBA

  • Result: This code will display the second-highest value found in the selected range.

Find Second Highest Value Result

Summing Values by Color:

  • Scenario: You’ve lent money to people, and you want to calculate how much money you still need to receive from those who owe you. Owing money is indicated by red font color.

Code:

Dim toReceive As Integer, i As Integer
toReceive = 0

For i = 1 To 12
If Cells(i, 1).Font.Color = vbRed Then
toReceive = toReceive + Cells(i, 1).Value
End If
Next i

Sum by Color in Excel VBA

  • Result: This code calculates and displays the total amount of money you’re yet to receive.

Sum by Color Result

Deleting Blank Cells:

  • Scenario: You want to remove blank cells from a range, shifting the non-blank cells to fill the gaps.

Code:

Dim counter As Integer, i As Integer
counter = 0

For i = 1 To 10
If Cells(i, 1).Value <> "" Then
Cells(counter + 1, 2).Value = Cells(i, 1).Value
counter = counter + 1
End If
Next i

Range("A1:A10").Value = ""
Range("A1:A10").Value = Range("B1:B10").Value
Range("B1:B10") = ""

Delete Blank Cells in Excel VBA

  • Result: This code deletes the blank cells in column A and shifts non-blank cells up.

Delete Blank Cells Result

Swapping Values:

  • Scenario: You want to swap the values of two cells in Excel.

Code:

Dim temp As Double
temp = Range("A1").Value
Range("A1").Value = Range("B1").Value
Range("B1").Value = temp

Swap Values in Excel VBA
  • Result: This code swaps the values of cells A1 and B1.
Swap Values Result

Conclusion:

Understanding these practical applications of Excel VBA fundamentals provides a solid basis for your Excel automation journey. Whether you need to find specific values, perform calculations, or manipulate cell contents, VBA can streamline your work. With this knowledge, you’ll be well-prepared to tackle various automation tasks in Excel, enhancing your productivity and efficiency.

Mastering Conditional Logic and Mathematical Operators in Excel VBA

Introduction:

Excel VBA (Visual Basic for Applications) is a powerful tool for creating dynamic and intelligent spreadsheets. A crucial aspect of VBA programming is understanding conditional logic and mathematical operators. In this comprehensive guide, we’ll explore these key concepts using practical examples, ensuring you have a solid foundation for enhancing your Excel automation skills.

Logical Operators:

Logical Operator And:

The logical operator “And” is used to create compound conditions in Excel VBA. It allows you to check if multiple conditions are met before executing specific code. Here’s an example:

Code:

Dim score1 As Integer, score2 As Integer, result As String
score1 = Range("A1").Value
score2 = Range("B1").Value

If score1 >= 60 And score2 > 1 Then
result = "Pass"
Else
result = "Fail"
End If

Range("C1").Value = result

Excel VBA Logical Operator And

In this example:

  • We retrieve the values of score1 and score2 from cells A1 and B1.
  • Excel VBA checks if both score1 is greater than or equal to 60 and score2 is greater than 1.
  • The result will be “Pass” if both conditions are met; otherwise, it will be “Fail.”

Logical Operator Or:

The “Or” operator in Excel VBA is used to check if at least one of the given conditions is true. Let’s see how it works:

Code:

Dim score1 As Integer, score2 As Integer, result As String
score1 = Range("A1").Value
score2 = Range("B1").Value

If score1 >= 60 Or score2 > 1 Then
result = "Pass"
Else
result = "Fail"
End If

Range("C1").Value = result

Excel VBA Logical Operator Or

In this case:

  • Excel VBA checks if either score1 is greater than or equal to 60 or score2 is greater than 1.
  • The result will be “Pass” if at least one of the conditions is met.

Logical Operator Not:

The “Not” operator is used to negate a condition in Excel VBA. Here’s an example:

Code:

Dim score1 As Integer, score2 As Integer, result As String
score1 = Range("A1").Value
score2 = Range("B1").Value

If score1 >= 60 And Not score2 = 1 Then
result = "Pass"
Else
result = "Fail"
End If

Range("C1").Value = result

Excel VBA Logical Operator Not

In this scenario:

  • Excel VBA checks if score1 is greater than or equal to 60 and score2 is not equal to 1.
  • The result will be “Pass” if both conditions are met.

Select Case:

Select Case is a powerful alternative to multiple If-Then statements for handling different cases in Excel VBA:

Code:

Dim score As Integer, result As String
score = Range("A1").Value

Select Case score
Case Is >= 80
result = "Very Good"
Case Is >= 70
result = "Good"
Case Is >= 60
result = "Sufficient"
Case Else
result = "Insufficient"
End Select

Range("B1").Value = result

Select Case Result

In this example:

  • Select Case allows you to execute different code blocks based on the value of the variable score.
  • The result will be set based on the conditions specified in the Case statements.

Mathematical Operators:

Mod Operator:

The Mod operator in Excel VBA returns the remainder of a division. Let’s see how it works:

Code:

MsgBox 7 Mod 2

Excel VBA Mod Operator Result

This code line displays a message box with the result of 7 Mod 2.

Result when you click the command button on the sheet:

  • 7 is divided by 2 (3 times) to give a remainder of 1.

Code:

MsgBox 8 Mod 2

Excel VBA Mod Operator Result

Result:

  • 8 is divided by 2 (exactly 4 times) to give a remainder of 0.

Prime Number Checker:

Now, let’s delve into a practical example where we use Excel VBA to check whether a number is prime or not:

Code:

Dim divisors As Integer, number As Long, i As Long
divisors = 0
number = InputBox("Enter a number")

For i = 1 To number
If number Mod i = 0 Then
divisors = divisors + 1
End If
Next i

If divisors = 2 Then
MsgBox number & " is a prime number"
Else
MsgBox number & " is not a prime number"
End If

Enter a Number

Prime Number Checker Result

In this code:

  • We start by declaring variables and initializing divisors to 0.
  • The user is prompted to enter a number.
  • We use a loop to iterate through numbers from 1 to the entered number.
  • The Mod operator helps us check if number is divisible by i. If it is, we increment the divisors count.
  • If divisors equals 2, the number has only two divisors (1 and itself), so it’s considered a prime number.

Conclusion:

Mastering logical and mathematical operators in Excel VBA is essential for building dynamic and intelligent spreadsheets. These operators allow you to create decision-making structures and perform mathematical calculations, enhancing your Excel automation skills and problem-solving abilities. With this knowledge, you can take your Excel projects to the next level.

By understanding these concepts, you gain the capability to create sophisticated spreadsheets and automate complex tasks in Excel. Logical and mathematical operators are the building blocks of decision-making and data processing, making your Excel projects more efficient and intelligent. Whether you’re working with financial models, data analysis, or any other task in Excel, these skills will prove invaluable.

Expanding the Scope:

If you’re ready to take your Excel VBA skills even further, you can explore advanced topics like creating custom functions, working with external data sources, and developing user-friendly interfaces. The possibilities are endless, and Excel VBA can be your tool for tackling intricate challenges with ease.

In conclusion, mastering Excel VBA’s conditional logic and mathematical operators is a gateway to creating Excel solutions that are not only efficient but also capable of handling complex real-world scenarios.

Mastering Conditional Logic in Excel VBA: If-Then-Else Statements

Introduction:

Excel VBA (Visual Basic for Applications) is a powerful tool for automating tasks and processes in Microsoft Excel. It allows you to create complex scripts to manipulate data, perform calculations, and make decisions. Conditional logic is a fundamental part of programming, and in this comprehensive guide, we’ll delve into If-Then-Else statements in Excel VBA.

The Power of Conditional Logic:

Conditional logic in Excel VBA enables you to make your code smarter by allowing it to respond to specific conditions. If-Then-Else statements provide a way to execute different code blocks based on whether a particular condition is met. These statements are essential for creating dynamic, responsive, and intelligent Excel applications.

The If-Then Statement:

The If-Then statement is the building block of conditional logic. It allows you to execute code lines when a specified condition is true. Here’s a more detailed look at how to use If-Then in Excel VBA:

Code:

Dim score As Integer, result As String
score = Range("A1").Value

If score >= 60 Then
result = "Pass"
End If

Range("B1").Value = result

Excel VBA If Then Statement

In this example:

  • We declare two variables, score and result, and retrieve the value in cell A1.
  • The If statement checks if the score is greater than or equal to 60.
  • If the condition is true, it assigns “Pass” to the result variable.
  • The result is then displayed in cell B1.

This basic If-Then structure sets the stage for more advanced decision-making processes.

The If-Then-Else Statement:

The If-Then-Else statement extends conditional logic to provide two different outcomes based on whether a condition is true or false. Here’s how it works:

Code:

Dim score As Integer, result As String
score = Range("A1").Value

If score >= 60 Then
result = "Pass"
Else
result = "Fail"
End If

Range("B1").Value = result

Excel VBA Else Statement

In this example:

  • We use the If-Then-Else structure to determine whether the score is above or below 60.
  • If the score is greater than or equal to 60, the result is set to “Pass.”
  • If not, the result is assigned “Fail.”

This more advanced logic allows you to create applications that respond dynamically to various scenarios.

Conclusion:

Conditional logic is an indispensable part of Excel VBA programming, enabling you to build intelligent, automated solutions. If-Then-Else statements provide the tools you need to create applications that respond to specific conditions, making your work in Excel more efficient and dynamic. With this knowledge, you can take your Excel skills to the next level.