In this guide, we’ll explore essential string manipulation techniques in Excel VBA. By adding these tools to your VBA skill set, you can effectively work with text data in your Excel macros. We’ll cover joining strings, extracting substrings, reversing text, converting to proper case, and counting words within a selected range.
Join Strings:
Use the ‘&’ operator to concatenate strings. Example:
To extract the rightmost characters from a string, use the “Right“ function. Example:
MsgBoxRight("example text",2)
Mid Function:
To extract a substring starting in the middle of a string, use the “Mid" function. Example:
MsgBoxMid("example text",9,2)
Len Function:
To get the length of a string, use the "Len" function. Example:
MsgBoxLen("example text")
Instr Function:
To find the position of a substring in a string, use the “Instr" function. Example:
MsgBoxInstr("example text","am")
Separate Strings:
Use a loop to separate strings. This is particularly helpful when you need to split a single cell into multiple columns based on a delimiter like a comma. Example:
DimtextAsString,reversedTextAsString,lengthAsInteger,iAsIntegertext=InputBox("Enter the text you want to reverse")length=Len(textFori=0Tolength-1reversedText=reversedText&Mid(text, (length-i),1)NextiMsgBoxreversedText
Convert to Proper Case:
Convert text to proper case, where the first letter of each word is in uppercase, and the rest are in lowercase. Example:
Count the number of words in a selected range, assuming one or more spaces separate words. Example:
DimrngAsRange,cellAsRangeDimcellWords,totalWordsAsInteger,contentAsStringSetrng=SelectioncellWords=0totalWords=0ForEachcellInrngIfNotcell.HasFormulaThencontent=cell.Valuecontent=Trim(content)Ifcontent=""ThencellWords=0ElsecellWords=1EndIfDoWhileInStr(content,"") >0content=Mid(content,InStr(content,""))content=Trim(content)cellWords=cellWords+1LooptotalWords=totalWords+cellWordsEndIfNextcellMsgBoxtotalWords&" words found in the selected range."
These string manipulation techniques are invaluable when working with text data in Excel VBA. They allow you to join, extract, reverse, convert, and analyze text efficiently, enhancing your ability to automate tasks involving strings.
In Excel VBA, mastering the art of error handling and debugging is crucial for creating robust and efficient macros. This guide will take you through common VBA macro errors, how to deal with them, and essential debugging techniques.
Common Macro Errors:
Variable/Property Not Defined:
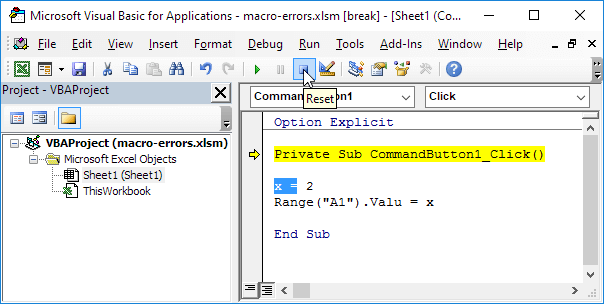
One of the most common errors in VBA macros is when a variable or property is not defined correctly. By using the “Option Explicit" statement at the beginning of your code, you are required to declare all variables explicitly. Let’s create an error as an example:
x=2Range("A1").Valu=x
Result:The variable ‘x’ is not defined, and Excel VBA highlights it in blue to indicate the error.
Handling Variable/Property Not Defined Error:
To fix this error, add the following code line at the start of your code to declare the variable ‘x’:
DimxAsInteger
Debugging:
Single Step:
Debugging your code is essential for understanding and resolving errors. By pressing F8, you can single step through your code, which allows you to see the effect of each code line on your worksheet. Consider this example:
Result: Single-stepping through this code helps you understand how values are assigned to cells.
Breakpoint:
Setting breakpoints is another useful technique. You can halt execution at specific code lines by clicking on the left margin where you want to place a breakpoint. Then, click the green arrow to execute the macro until the breakpoint.
Result: The macro only executes a portion of the code until the breakpoint is reached. To remove the breakpoint, click on the red dot.
Error Handling:
On Error Resume Next:
To ignore errors, you can use the ‘On Error Resume Next’ statement. This allows your code to continue executing, even when it encounters errors. Here’s an example that calculates the square root of values in a range:
To handle errors more gracefully, you can use ‘On Error GoTo Label.’ This approach redirects the code to a specific label when an error occurs. Here’s a modified version of the previous example:
DimrngAsRange,cellAsRangeSetrng=SelectionForEachcellInrngOnErrorGoToInvalidValuecell.Value=Sqr(cell.Value)NextcellExitSubInvalidValue:MsgBox"Error: "&Err.Number&" at cell "&cell.AddressResumeNext
The Err Object:
When an error occurs, the properties of the Err object are filled with information about the error. These properties include Err.Number, which is the error number, and Err.Description, which is a description of the error. Here’s an example:
DimrngAsRange,cellAsRangeSetrng=SelectionForEachcellInrngOnErrorGoToInvalidValuecell.Value=Sqr(cell.Value)NextcellExitSubInvalidValue:SelectCaseErr.NumberCase5MsgBox"Can't calculate square root of a negative number at cell "&cell.AddressCase13MsgBox"Can't calculate square root of text at cell "&cell.AddressEndSelectResumeNext
Interrupt a Macro:
You can interrupt a running macro at any time by pressing Esc or Ctrl + Break. However, you can also prevent users from interrupting your macro by using the following code line at the beginning of your code:
Application.EnableCancelKey=xlDisabled
Result: This line disables the ability to interrupt the macro, but it’s essential to re-enable it at the end of your code using:
Application.EnableCancelKey=xlInterrupt
Conclusion: Mastering error handling and debugging techniques is vital for writing reliable VBA macros in Excel. By understanding common errors and using debugging tools, you can create efficient, error-free macros that streamline your data processing and analysis tasks.
Loops are an essential component of Excel VBA (Visual Basic for Applications), enabling you to automate repetitive tasks and work with data efficiently. In this guide, we’ll explore various types of loops and how to use them effectively in Excel VBA.
Single Loop:
A single loop is used to iterate through a one-dimensional range of cells. Let’s start by placing a command button on your worksheet and adding the following code:
DimiAsIntegerFori=1To6Cells(i,1).Value=100Nexti
Result: This loop executes six times, filling column A with the value 100. Proper indentation enhances code readability.
Double Loop:
Double loops are employed to loop through two-dimensional cell ranges. Add this code to a command button:
Result: This loop eliminates duplicates and keeps only unique numbers.
Conclusion: Mastering loops in Excel VBA is crucial for automating tasks, working with data, and improving efficiency. Understanding the different loop types and their applications empowers you to tackle a wide range of tasks in your Excel workbooks. With practice and creativity, you can harness the power of loops to streamline your data processing and analysis.
The Range object is a powerhouse in Excel VBA, and understanding its properties and methods is essential for effective VBA programming. In this comprehensive guide, we’ll delve into the versatility of Range objects and how they can be harnessed to perform a variety of tasks in Excel.
Range Object Basics
The Range object is the representation of a cell or cells on your worksheet and is the cornerstone of Excel VBA. Let’s explore its properties and methods, which are crucial for manipulating data.
Examples of Range Usage:
Setting values to a specific cell:
Code:
Range("B3").Value=2
Setting values to a range of cells:
Code:
Range("A1:A4").Value=5
Setting values to non-contiguous ranges:
Code:
Range("A1:A2,B3:C4").Value=10
Working with Cells
While the Range object is powerful, you can also achieve specific cell interactions using the Cells property.
Set the value of a specific cell:
Code:
Cells(3,2).Value=2
Copy data from one range to another:
Code:
Range("C3:C4").Value=Range("A1:A2").Value
Declaring a Range Object
In Excel VBA, declaring a Range object is a common practice for efficient coding.
The CurrentRegion property defines a range bounded by any combination of blank rows and columns.
Find the CurrentRegion of cell A1:
Code:
Range("A1").CurrentRegion.Select
Find the CurrentRegion of cell B3:
Code:
Range("B3").CurrentRegion.Select
Dynamic Range and Coloring Max Value
This code snippet demonstrates coloring the maximum value in a dynamic range.
Code:
' Insert your dynamic rangeDimrngAsRangeSetrng=Range("A1:A10")' Find the maximum value in the rangemaximum=WorksheetFunction.Max(rng)' Color the maximum valueForEachcellInrngIfcell.Value=maximumThencell.Interior.ColorIndex=22Nextcell
Resizing Ranges with Resize
The Resize property allows you to make a range larger or smaller by specifying the number of rows and columns.
Code:
Range("A1:C4").Resize(3,2).Select
Code:
Range("A1:C4").Resize(,1).Select
Union and Intersect Methods
The Union and Intersect methods enable you to work with multiple ranges at once.
Union of two ranges:
Code:
Union(Range("B2:C7"),Range("C6:F8")).Select
Intersect of two ranges:
Code:
Intersect(Range("B2:C7"),Range("C6:F8")).Select
Testing a Selection
You can test a selection in Excel VBA using Count, IsNumeric, IsEmpty, and Intersect.
Working with the Areas Collection:
Counting Areas:To determine the number of areas within a given range, use the Areas.Count property.
Result: This code will display the count of areas within the specified range.
Accessing Specific Areas:You can access specific areas within a range by using index values. The following code counts the number of cells in the first area.
Code:
MsgBoxrangeToUse.Areas(1).Count
Result: This code displays the count of cells in the first area of the range.
Looping Through Areas:To process each area in a range and count the cells in each area, you can use a loop. The following code does just that:
Result: This code will display the count of cells in each area of the range.
Comparing Ranges:
Scenario:You have randomly selected ranges, and you want to highlight cells that contain unique values. This code will help identify values that only appear once across all selected ranges.
Code:
DimrangeToUseAsRange,singleAreaAsRange,cell1AsRange,cell2AsRange,iAsInteger,jAsIntegerSetrangeToUse=SelectionCells.Interior.ColorIndex=0Cells.Borders.LineStyle=xlNoneIfSelection.Areas.Count<=1ThenMsgBox"Please select more than one area."ElserangeToUse.Interior.ColorIndex=38ForEachsingleAreaInrangeToUse.AreassingleArea.BorderAround ColorIndex:=1, Weight:=xlThinNextsingleAreaFori=1TorangeToUse.Areas.CountForj=i+1TorangeToUse.Areas.CountForEachcell1InrangeToUse.Areas(i)ForEachcell2InrangeToUse.Areas(j)Ifcell1.Value=cell2.ValueThencell1.Interior.ColorIndex=0cell2.Interior.ColorIndex=0EndIfNextcell2Nextcell1NextjNextiEndIf
Result: This code will highlight unique values in the selected ranges while removing the highlighting for non-unique values.
Mastering Offset Property:
The Offset property is a powerful tool in Excel VBA, enabling you to navigate to specific cells relative to a starting point. Let’s explore its applications:
Result: These code lines select the range that is 3 rows below and 2 columns to the right of Range(“A1:A2”). Remember that Offset always takes the top left cell of a range as the starting point.
From Active Cell to Last Entry:
The End property is a valuable asset in Excel VBA, especially when you need to find the last entry in a column. Let’s see how it works:
Selecting the Last Entry in a Column:
Code:
Range("A5").End(xlDown).Select
Note: You can use various starting points such as Range(“A1”) or Range(“A2”). This code line is equivalent to pressing the END+DOWN ARROW.
Result: The last entry in the column is selected.
Selecting a Range to the Last Entry:
Code:
Range(Range("A5"),Range("A5").End(xlDown)).Select
Result: This code line selects the range from cell A5 to the last entry in the column.
Selecting from the Active Cell to the Last Entry:
Code:
ange(ActiveCell,ActiveCell.End(xlDown)).Select
Result: When you select any cell, this code line chooses the range from the active cell down to the last entry in the column.
You’re not limited to moving down; you can use constants like xlUp, xlToRight, and xlToLeft to navigate in other directions, allowing for versatile and precise selections.
Final Thoughts
Mastering Range objects is crucial for proficient Excel VBA programming. These objects empower you to manipulate data with precision and flexibility, making your Excel tasks more efficient and automated. These skills are invaluable for handling complex data analysis tasks with ease.