Basics of VBA / Macros Chapter – 68 (Application Object Part-1)

Application Object

The mother of all objects is Excel itself. We call it the Application object. The application object gives access to a lot of Excel related options.

WorksheetFunction

You can use the WorksheetFunction property in Excel VBA to access Excel functions.

1. For example, place a command button on your worksheet and add the following code line:

Range(“A3”).Value = Application.WorksheetFunction.Average(Range(“A1:A2”))

When you click the command button on the worksheet, Excel VBA calculates the average of the values in cell A1 and cell A2 and places the result into cell A3.

WorksheetFunction in Excel VBA

Instead of Application.WorksheetFunction.Average, simply use WorksheetFunction.Average. If you look at the formula bar, you can see that the formula itself is not inserted into cell A3. To insert the formula itself into cell A3, use the following code line:

Range(“A3”).Value = “=AVERAGE(A1:A2)”

ScreenUpdating

Sometimes you may find it useful to disable screen updating (to avoid flickering) while executing code. As a result, your code will run faster.

1. For example, place a command button on your worksheet and add the following code lines:

Dim i As Integer

For i = 1 To 10000
Range(“A1”).Value = i
Next i

When you click the command button on the worksheet, Excel VBA displays each value a tiny fraction of a second and this can take some time.

ScreenUpdating

2. To speed up the process, update the code as follows.

Dim i As Integer

Application.ScreenUpdating = False

For i = 1 To 10000
Range(“A1”).Value = i
Next i

Application.ScreenUpdating = True

As a result, your code will run much faster and you will only see the end result (10000).

DisplayAlerts

You can instruct Excel VBA not to display alerts while executing code.

1. For example, place a command button on your worksheet and add the following code line:

ActiveWorkbook.Close

When you click the command button on the worksheet, Excel VBA closes your Excel file and asks you to save the changes you made.

DisplayAlerts

2. To instruct Excel VBA not to display this alert while executing code, update the code as follows.

Application.DisplayAlerts = False

ActiveWorkbook.Close

Application.DisplayAlerts = True

As a result, Excel VBA closes your Excel file, without asking you to save the changes you made. Any changes are lost.

Calculation

By default,  calculation is set to automatic. As a result, Excel recalculates the workbook automatically each time a value affecting a formula changes. If your workbook contains many complex formulas, you can speed up your macro by setting calculation to manual.

1. For example, place a command button on your worksheet and add the following code line:

Application.Calculation = xlCalculationManual

When you click the command button on the worksheet, Excel VBA sets calculation to manual.

2. You can verify this by clicking on File, Options, Formulas.

Calculation Options

3. Now when you change the value of cell A1, the value of cell B1 is not recalculated.

Manual Calculation

You can manually recalculate the workbook by pressing F9.

4. In most situations, you will set calculation to automatic again at the end of your code. Simply add the following code line to achieve this.

Application.Calculation = xlCalculationAutomatic

Excel Basics – Ribbon

Excel selects the ribbon’s Home tab when you open it. Learn how to use the ribbon.

Tabs

The tabs on the ribbon are: File, Home, Insert, Page layout, Formulas, Data, Review, View and Help. The Home tab contains the most frequently used commands in Excel.

Tabs

Groups

Each tab contains groups of related commands. For example, the Page Layout tab contains the Themes group, the Page Setup group, etc.

Groups

Use the Ribbon

Let’s use the ribbon to create a table. Tables allow you to analyze your data in Excel quickly and easily.

1. Open data-set.xlsx.

2. Click any single cell inside the data set.

3. On the Insert tab, in the Tables group, click Table.

Use the Ribbon

The Create Table dialog box appears.

4. Excel automatically selects the data for you. Check ‘My table has headers’ and click on OK.

Create Table

Result. Excel creates a nicely formatted table for you.

Excel Table

Note: use the drop-down arrows to quickly sort and filter. Visit our chapter about tables to learn more about this topic.

Collapse the Ribbon

You can collapse the ribbon to get extra space on the screen. Right click anywhere on the ribbon, and then click Collapse the Ribbon (or press CTRL + F1).

Collapse the Ribbon

Result.

Hidden Ribbon

SAP Logon: GUI & Navigation

SAP Logon

SAP Logon is used initiate a user session in a desired SAP Server. The same SAP Logon pad can be used to login into different SAP ERP environments. SAP Logon is a client-side software usually used by Consultants, developers and end-user

  • To access SAP, double click in the SAP logon PAD.
  • You are shown a list of servers that you could log into right now there is only one server.
  •  
  • But you see multiple servers like one for production, one for Testing one for development.
  • Select the server and click the Log on Button. In the next screen, enter your user id and password. You are taken to Sap’s easy access menu
  • At the top, you will see the menu bar. Next you will see the standard tool bar where you options to Print , Save Find , Scroll etc
  • To view or maintain any data in SAP or access different business process you need to know the corresponding transaction. Every transaction has a unique code.
  • For example, transaction number to maintain a PA data is PA30
  • To access the transaction, in the command prompt enter PA30 and hit enter.
  • If you notice the title bar changes in accordance with the transaction, you are currently in.

  • To go back to the initial screen, click the back button
  • Alternatively, if you do not remember the transaction code, a tree is provided with all the transaction available.
  • Navigate in the tree. Double click in the corresponding transaction. Suppose you do not want to navigate so much to access a transaction, right click on it and select Add to favorites
  • The transaction is added to your favorites. At the bottom of a screen you will notice Message Bar.  This Bar has three colors
  • Red – for errors
  • Yellow – for warnings
  • Green – for success
  • If you double click on the bar, detailed information of the message is reflected
  • At the bottom, you will see various system related information like the client or the program you are currently in.
  • To get help in SAP, select on the corresponding screen element and press F1
  • Suppose I want help on command prompt, pressing F1 gives me a very detailed help document.
  • That is it to the SAP GUI

SAP GUI Navigation

When you logon to SAP or you open a new session-  you will see the following screen

Let us look into the various screen elements-

SAP User Menu

The SAP User Menu is tailored to the user’s specific needs. It includes all transactions relevant to a user, grouped under relevant folders

SAP Easy Access Menu

The SAP Easy Access Menu includes all transactions offered by SAP, grouped in folders according to SAP modules (FI/CO, MM, etc.). It is not tailored to the user’s specific needs

SAP Menu Bar

The SAP Menu Bar CHANGES from one screen to another. You follow a menu path to access a function or a transaction.

SAP Standard Tool Bar

The SAP Standard Toolbar does NOT change from one transaction to another. You can use the SAP Standard Toolbar to execute various functions.

  • Buttons available are enabled
  • Buttons not available are disabled
  • In the “Transaction Box”, you can directly access a transaction, without using the SAP Menu, by entering the transaction code

General Icons and their Description


Hint: You open a maximum of 6 different SAP session at a time

SAP Application Toolbar

The SAP Application Toolbar CHANGES from one screen to another.

SAP Status Bar

The SAP Status Bar does NOT change from one screen to another. It tells you WHERE you are in SAP:

  • Which environment you are using (Production, Development, Quality).
  • In which session you are in (as you can open up to 6 sessions).
  • What client you are using.

Clicking on   button gives more information –

SAP Function Keys

Functions keys are just another way of navigating around SAP. The availability of function keys CHANGES from one screen to another While in a transaction, right click on your mouse , you will see a list of function keys available

How to get HELP in SAP

More often than not while using SAP you will need HELP. You can access in-built SAP Help functionality for ANY screen element (like text fields , buttons ,labels etc ) for ANY SAP Screen In this training , we will assume you need help for the following field –

You can access help in three different ways

  1. Clicking on the “Help” button.
  2. Right-clicking on your mouse and selecting “Help”.
  3. Pressing the F1 button on your keyboard.

A Performance Assistance Screen Opens-

1. It gives you information on how to fill the specific field on screen

2. Clicking on Technical Information Button gives you information like program name , table name and other technical details which comes in very handy at times

3. Clicking on portal button gives you access to the online SAP Library available via the internet.

SAP ERP Modules

SAP ERP Modules

SAP Modules can be categorized into

  • Functional Modules
  • Technical Modules

Below is a list of key SAP Modules.

  1. SAP FI Module – FI stands for Financial Accounting
  2. SAP CO Module – CO stands for Controlling
  3. SAP HCM Module – HR stands for Human Resources
  4. SAP MM Module – MM is Materials Management
  5. SAP QM Module – QM stands for Quality Management
  6. SAP PP Module – PP is Production Planning
  7. SAP SD Module – SD is Sales and Distribution
  8. SAP BW Module – where BW stands for Business (Data) Warehouse
  9. SAP Basis – SAP Basis is the technical foundation that enables SAP applications to function. It consists of middleware programs and tools that support the interoperability and portability of SAP applications across systems and databases.
  10. SAP ABAP –  ABAP (Advanced Business Application Programming) ABAP is a programming language that runs in the SAP ABAP runtime environment, created and used by SAP for the development of application programs including: Reports. Module Pool Programming. Interfaces.
  11. SAP CRM – where CRM stands for Customer Relationship Management
  12. SAP HANA – where Hana stands for High-performance Analytic Appliance.
  13. SAP EC Module – where EC stands for Enterprise Controlling
  14. SAP TR Module – where TR stands for Treasury
  15. SAP IM Module – where IM stands for Investment Management
  16. SAP IS –where IS stands for Industries Specific Solution
  17. SAP PS Module– and PS is Project Systems
  18. SAP CAC – Cross Application Components
  19. SAP SCM- where SCM stands for Supply Chain Management
  20. SAP PLM- where PLM stands for Product LifeCycle Management
  21. SAP SRM- where SRM stands for Supplier Relationship Management
  22. SAP CS- where CS stands for Customer Service
  23. SAP SEM – where SEM stands for STRATEGIC ENTERPRISE MANAGEMENT
  24. SAP RE – where RE stands for Real Estate
  25. SAP PM Module– where Plant Maintenance is the PM
  26. SAP Security Learn more about SAP Security
  27. SAP FSCM – where FSCM stands for Financial Supply Chain Management
  28. SAP NetWeaver
  29. SAP IS – where IS stands for Industry Specific Solution
  30. SAP XI – where XI stands for Exchange Infrastructure
  31. SAP Solution Manager – Learn more about Solution Manager
  32. SAP LE – where LE stands for Logistics Execution
  33. SAP APO- where APO stands for Advanced Planning and Optimization
  34. SAP AFS – where AFS stands for Apparel and Footwear Solution
  35. SAP CC – where CC stands for Convergent Charging
  36. SAP ITS – where ITS stands for Internet Transaction Server
  37. SAP ICM – where ICM stands for Incentive and Commission Management
  38. SAP KW – where KW stands for Knowledge Warehouse
  39. SAP MDM – where MDM stands for Master Data Management

SAP as Business Suite

SAP – Business Suite

SAP Business Suite is collection of fully integrated applications such as SAP customer relationship management (CRM), SAP Enterprise Resource Planning (ERP), SAP product lifecycle management (PLM), SAP supplier relationship management (SRM), and SAP supply chain management (SCM) modules.

SAP now offers variety of products to address varied needs of an organization

SAP HANA: – High Performance Analytic Appliance uses in-memory computing, a breakthrough technology that enables analysis of very large, non-aggregated data at unprecedented speed in local memory (vs. disk-based database) enabling complex analyses, plans and simulations on real-time data.

SAP Convergent Charging: – SAP Convergent Charging provides a rating and charging solution for high-volume processing in service industries. It delivers pricing design capabilities, high performance rating and convergent balance management.

Customer Relationship Management:- Unlike other CRM software, the SAP Customer Relationship Management (SAP CRM) application, part of the SAP Business Suite, not only helps you address your short-term imperatives – to reduce cost and increase your decision-making ability – but can also help your company achieve differentiated capabilities in order to compete effectively over the long term.

 Enterprise Resource Planning: – A sound foundation is necessary to compete and win in the global marketplace. The SAP ERP application supports the essential functions of your business processes and operations efficiently and are tailored to specific needs of your industry like SAP ERP Financials, SAP ERP Human capital management, SAP ERP Operations, SAP ERP corporate services.

SAP Environment, Health, and Safety Management:- It supports environmental, occupational and product safety processes, regulatory compliance, and corporate responsibility. This is accomplished by embedding corporate policies, compliance, and environmental, health and safety capabilities with global business processes for human resources, logistics, production and finance.

SAP Global Batch Traceability: – It allows you to completely trace tracked objects, for example, a batch, across both SAP systems and non-SAP systems. In the event of a recall or withdrawal, SAP GBT ensures the timely compliance with legal reporting timelines. Furthermore, it helps you to minimize cost and corporate risk exposure. You can also analyze multiple objects, for example, batches, in one run.

SAP Product Life Cycle Management: – To survive in an ever-changing global environment, creating and delivering innovative and market differentiating products and services is what distinguishes your company from the competition. The SAP Product Lifecycle Management (SAP PLM) application provides you with a 360-degree-support for all product-related processes – from the first product idea, through manufacturing to product service

SAP Supplier Life Cycle Management: – SAP Supplier Lifecycle Management is a holistic approach to managing supplier relationships. It deals with the supply base to constantly determine the right mix of suppliers. It covers the lifecycle of individual suppliers? from onboarding to a continuous development.

Supply Chain Management: – You face enormous pressure to reduce costs while increasing innovation and improving customer service and responsiveness. SAP Supply Chain Management (SAP SCM) enables collaboration, planning, execution, and coordination of the entire supply network, empowering you to adapt your supply chain processes to an ever-changing competitive environment.

Supplier Relationship Management: – With SAP SRM you can examine and forecast purchasing behavior, shorten procurement cycles, and work with your partners in real time. This allows you to develop long-term relationships with all those suppliers that have proven themselves to be reliable partners.

Governance, Risk and Compliance: – Risk is unavoidable, but it can be managed. With governance, risk, and compliance (GRC), businesses can strategically balance risk and opportunity.

Sales and operations planning: – SAP Sales and Operations Planning enables you to optimally and profitably meet long-term future demand. Typically, this process repeats every month and involves many participants including Sales, Marketing, Finance, Demand Planning, and Supply Chain Planning.

SAP Transportation Management: – It supports you in all activities connected with the physical transportation of goods from one location to another.

Extended Warehouse Management: – SAP Extended Warehouse Management gives you the option of mapping your entire warehouse complex in detail in the system, down to the storage bin level. Not only does this give you an overview of the total quantity of a product in the warehouse, but you can also always see exactly where a specific product is, at any time, in your warehouse complex. With EWM, you can optimize the use of various storage bins and stock movements and can combine the storage of stocks from several plants in randomly managed warehouses.

Mobile Apps: – Mobile devices can also access SAP system.

SAP – Systems Applications and Products

What is SAP ERP?

SAP stands for Systems Applications and Products in Data Processing. It is ERP (Enterprise Resource Planning) software as well as the name of the company. SAP software solution is for managing business operations and customer relationships. SAP is widely used for enterprise level ERP software for large scale business.

In normal business process multiple teams and steps are required to be involved for buying to selling of goods. This process required manual tasks and more employees. It needs HR to hire more employees for process handling. SAP makes it easy and less manual for large and medium enterprise for normal business. SAP involve many automated processes and more automation options are available also. In turn it reduces manual task and employee efforts.

That is a typical business process for any manufacturing company. Some key inferences one could derive from the scenario would be.

  • It has many departments or business units
  • These departments or business units continuously communicate and exchange data with each other
  • The success of any organization lies in effective communication, and data exchange, within these departments, as well as associated third party such as vendors, outsourcers, and customers.

Based on the way communication and data exchanged is managed. Enterprise systems can be broadly classified as Decentralized System or Centralized System. Centralized System which is also called as ERP.

As SAP is ERP solution it has centralized solution. There are many benefits of centralized systems. Key benefits of the centralized system are:

  • It eliminates the duplication, discontinuity, and redundancy in data.
  • Provides information across departments in real time.
  • It provides control over various business processes.
  • Increases productivity, better inventory management, promotes quality, reduced material cost, effective human resources management, reduced overheads boost profits.
  • Better customer interaction and increased throughput. It also improves customer service.

SAP is vast application which need dedicated system and database for processing. New version of SAP is Hana which is cloud based scalable system. ERP SAP is not cost beneficial for small scale businesses as it required initial investment.

Recording the Sap Macro

Recording the Sap Macro

When you are ready to perform the recording,  be sure you know the transaction you want to execute and the data that you can use.  You should also know the screens you plan to visit and the fields that you will be filling in.  You can always update the recording file, but the better your recording, the less errors you will encounter.

The important thing to remember is that GUI script can NOT perform any logic.  it only works for repeating the same steps over and over again.  This means that if you receive an error on some records, but not others, you will need to execute 2 different scripts.  One script will do the non errors, and other script will do the errors.  You can cut down a lot of time if you can segregate the data early.


Activate the recorder.  It is encouraged to always start the main screen in SAP.  This prevents weird things that happens if an error occurs during the playback.


Press More if you want to control where the file is saved.


When you are ready to start, press the record button (Red Dot Button). Then proceed to execute the transaction you wish to record.


Be sure to use ‘/N’ in front of the transaction code for opening Transaction Code in same window and ‘/O’ in front of the transaction code for opening Transaction Code in new window.


Enter in the document number and press Operations Button.


When I added a new operation, I entered it on the bottom of the screen.  This allows you to avoid the risk of overriding exisitng data.

Press Enter.
Press Components Tab


Again, add the data to the bottom of the screen.
Press Enter
Press Save
Sometimes there will be errors.  If errors occur, you need to remember that maybe not Every order you change will have the error.

I encourage you to press the green arrow back on every recording at the end.  This just helps to avoid incorrect loading of data.

Press stop.
Now, go find the file.  Be sure to RIGHT click on it.  If you double click on it, it will attempt to execute the exact same transaction again.
You should see something similar to this:


The parts of this file you care about are the lines that start: session.xxx
Next up, add this information to the excel file.

SAP Macro in Excel

This will depend on your version of excel, but what you need to do is find the macro button:


Be sure to enable macros.

When the macro window opens, be sure to select the correct view on the left hand side of the screen.  Then move to the code section and find the area shown that says “Paste your recorded script below”.
If there is anything currently in this section, be sure to remove it, and replace it with the information from your recording (session.xxx).

Now, I’m going to show you how to point this to your excel document.
session.findById(“wnd[0]/tbar[0]/okcd”).text = “/niw32”

session.findById(“wnd[0]”).sendVKey 0

Change:
session.findById(“wnd[0]/usr/ctxtCAUFVD-AUFNR”).text = “4000000”
To:
session.findById(“wnd[0]/usr/ctxtCAUFVD-AUFNR”).text = A

session.findById(“wnd[0]/tbar[1]/btn[17]”).press

Change:
session.findById(“wnd[0]/usr/subSUB_ALL:SAPLCOIH:3001/ssubSUB_LEVEL:SAPLCOIH:1107/tabsTS_1100/tabpVGUE/ssubSUB_AUFTRAG:SAPLCOVG:3010/tblSAPLCOVGTCTRL_3010/txtAFVGD-LTXA1[7,8]”).text = “my test op”
To:
session.findById(“wnd[0]/usr/subSUB_ALL:SAPLCOIH:3001/ssubSUB_LEVEL:SAPLCOIH:1107/tabsTS_1100/tabpVGUE/ssubSUB_AUFTRAG:SAPLCOVG:3010/tblSAPLCOVGTCTRL_3010/txtAFVGD-LTXA1[7,8]”).text = B

Since this can get long, I’ll jsut show you the first 2 changes.  You’ll notice that I found the first two lines where I entered in data.  I changed it to a single letter (no quotes).  This is the excel column where you enter in the data.  It’s that simple.  If anything is a constant, just leave it as it is.
When you’re done, press save and you’re ready to execute.

Executing the Script

Now, the first step before executing the script is gathering all the data.  Typically, this is done using SE16, SE16N, or certain reports (IW73, VA05, COOIS, etc).  As always, be careful with the data you enter.  It’s your user id that will be assigned to the change :).

Once you have the data you wish to execute, simply go the excel worksheet and execute the macro
*** NOTE:  Remember, when the script is running you can’t do anything with Excel.  You can continue working in SAP, but Excel will be locked for the duration of the script.


**** NOTE ***
This is a VERY important one.  Be sure that the first SAP window open on your screen is the client you wish to change.  If you are doubt, be sure to logout of any client/system you do not want to change.  For example, if you are logged into production and QA.  You want to make the change to QA, I encourage you to log out of production.


Press Run
Note:  if you have multiple excel windows open, be sure the correct macro name is highlighted.  If you aren’t sure, close the other excel documents.


Gui Script will always give you a chance to check the results of the FIRST record.


I encourage you to always check and make sure it saved properly before pressing ok.  If it did not, press cancel.  Otherwise the script will go all the way to the end.

Once you are done, it will return control back to excel.


As long as you see OK in the row, the record processed.  if you don’t see ok, you’ll need to check that record and possibly reprocess it.

Enable GUI Script Recording – SAP

Enable GUI Script Recording – SAP

This document describes how you can turn on GUI Script Recording. To use GUI Script Recording with Winshuttle Transaction, the scripting parameter must be set in RZ11 and GUI scripting must be enabled in the SAP GUI. Typically, Basis has to enable the parameter setting and users will have to enable scripting in their SAP GUI.

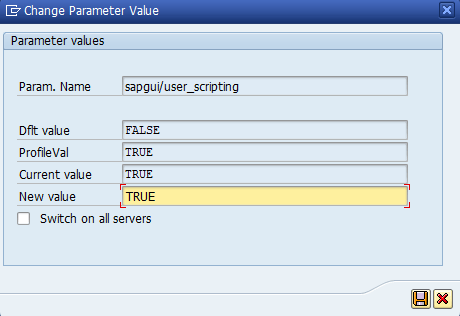
Enable the RZ11 parameter

  1. In SAP GUI, start transaction RZ11.

  1. Under Param. Name, enter sapgui/user_scripting.

    enter parameter name

  2. Click Change Value.

  3. In the New value box, enter TRUE, and then click the Save button.

    type true click save

    Scripting is enabled.

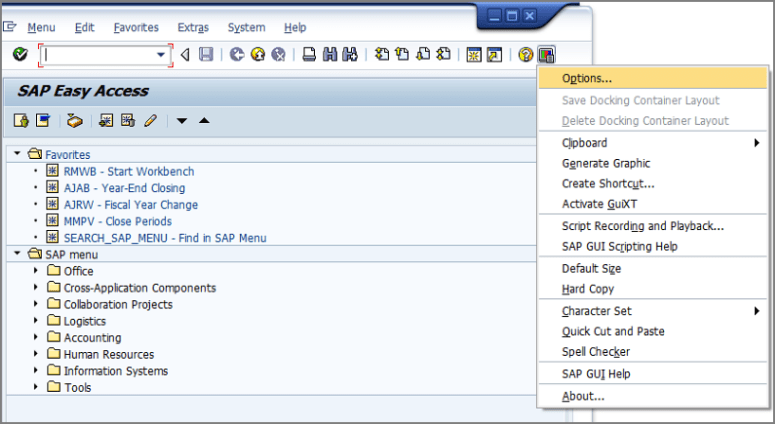
Enable scripting in SAP GUI

  1. Click Customize Local Layout, and then click Options.

    customize local layout dropdown menu

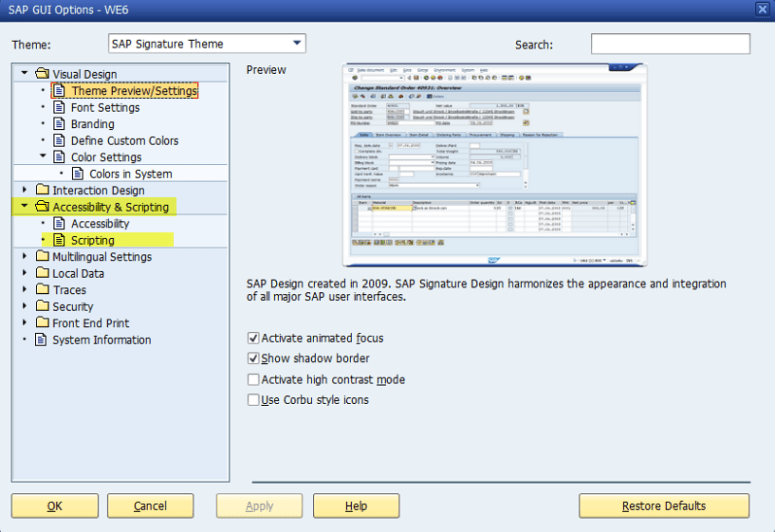
  2. Click Accessibility & Scripting, and then click Scripting.

    expanded accessibility and scripting section

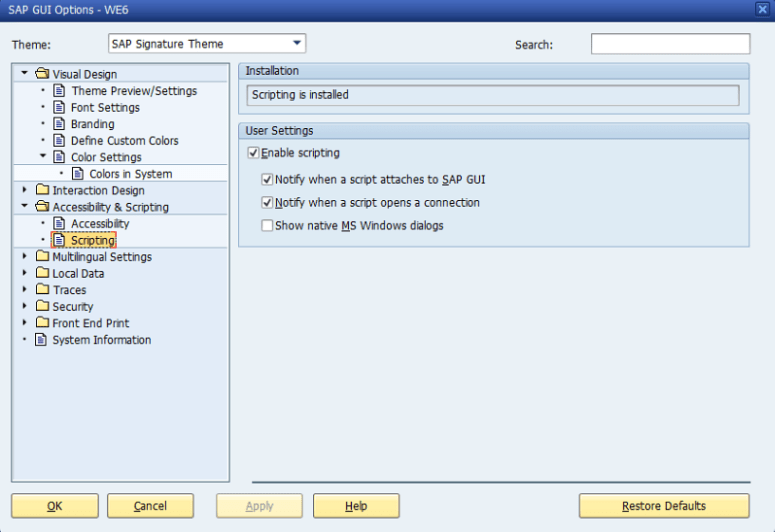
  3. Check the Enable scripting box.

    enable scripting checkbox

  4. Click OK.

Basics of VBA / Macros Chapter – 90 (Userform Part-11)

Interactive Userform

Below we will look at a program in Excel VBA that creates an interactive Userform. The Userform we are going to create looks as follows:

Excel VBA Interactive Userform

Explanation: whenever you enter a value in the ID text box, Excel VBA loads the corresponding record. When you click the Edit / Add button, Excel VBA edits the record on the sheet or adds the record when the ID does not yet exist. The Clear button clears all the text boxes. The Close button closes the Userform. To create this Userform, execute the following steps.

1. Open the Visual Basic Editor. If the Project Explorer is not visible, click View, Project Explorer.

2. Click Insert, Userform. If the Toolbox does not appear automatically, click View, Toolbox. Your screen should be set up as below.

Userform Screen Setup in Excel VBA

3. Add the labels, text boxes (first at the top, the second below the first, and so on) and command buttons. Once this has been completed, the result should be consistent with the picture of the Userform shown earlier. For example, create a text box control by clicking on TextBox from the Toolbox. Next, you can drag a text box on the Userform.

4. You can change the names and the captions of the controls. Names are used in the Excel VBA code. Captions are those that appear on your screen. It is good practice to change the names of the controls, but it is not necessary here because we only have a few controls in this example. To change the caption of the labels, text boxes and command buttons, click View, Properties Window and click on each control.

5. To show the Userform, place a command button on your worksheet and add the following code line:

Private Sub CommandButton1_Click()

UserForm1.Show

End Sub

We are now going to create the Sub UserForm_Initialize. When you use the Show method for the Userform, this sub will automatically be executed.

6. Open the Visual Basic Editor.

7. In the Project Explorer, right click on UserForm1 and then click View Code.

8. Choose Userform from the left drop-down list. Choose Initialize from the right drop-down list.

9. Add the following code line:

Private Sub UserForm_Initialize()

TextBox1.SetFocus

End Sub

This code line sets the focus on the first text box as this is where we want to start when the Userform is loaded. We have now created the first part of the Userform. Although it looks neat already, nothing will happen yet when we enter a value in the ID text box or when we click one of the command buttons.

10. In the Project Explorer, right click on UserForm1 and then click View Code.

11. Choose TextBox1 from the left drop-down list. Choose Change from the right drop-down list.

12. Add the following code line:

Private Sub TextBox1_Change()

GetData

End Sub

13. In the Project Explorer, double click on UserForm1.

14. Double click on the Edit / Add command button.

15. Add the following code line:

Private Sub CommandButton1_Click()

EditAdd

End Sub

16. Double click on the Clear command button.

17. Add the following code line:

Private Sub CommandButton2_Click()

ClearForm

End Sub

These subs call other subs we are going to create in a second.

18. Double click on the Close command button.

19. Add the following code line:

Private Sub CommandButton3_Click()

Unload Me

End Sub

This code line closes the Userform. Time to create the subs. You can go through our Function and Sub chapter to learn more about subs. If you are in a hurry, simply place the following subs into a module (In the Visual Basic Editor, click Insert, Module).

20. First, declare three variables of type Integer and one variable of type Boolean. Declare the variables in the General Declarations section (at the top of the module). This way you only have to declare the variables once and you can use them in multiple subs.

Dim id As Integer, i As Integer, j As Integer, flag As Boolean

21. Add the GetData sub.

Sub GetData()

If IsNumeric(UserForm1.TextBox1.Value) Then
flag = False
i = 0
id = UserForm1.TextBox1.Value

Do While Cells(i + 1, 1).Value <> “”

If Cells(i + 1, 1).Value = id Then
flag = True
For j = 2 To 3
UserForm1.Controls(“TextBox” & j).Value = Cells(i + 1, j).Value
Next j
End If

i = i + 1

Loop

If flag = False Then
For j = 2 To 3
UserForm1.Controls(“TextBox” & j).Value = “”
Next j
End If

Else
ClearForm
End If

End Sub

If the ID text box contains a numeric value, Excel VBA searches for the ID and loads the corresponding record. We use the Controls Collection to easily loop through text boxes. If Excel VBA cannot find the ID (flag is still False), it empties the second and third text box. If the ID text box does not contain a numeric value, Excel VBA calls the ClearForm sub.

22. Add the ClearForm sub.

Sub ClearForm()

For j = 1 To 3
UserForm1.Controls(“TextBox” & j).Value = “”
Next j

End Sub

Excel VBA clears all the text boxes.

23. Add the EditAdd sub.

Sub EditAdd()

Dim emptyRow As Long

If UserForm1.TextBox1.Value <> “” Then
flag = False
i = 0
id = UserForm1.TextBox1.Value
emptyRow = WorksheetFunction.CountA(Range(“A:A”)) + 1

Do While Cells(i + 1, 1).Value <> “”

If Cells(i + 1, 1).Value = id Then
flag = True
For j = 2 To 3
Cells(i + 1, j).Value = UserForm1.Controls(“TextBox” & j).Value
Next j
End If

i = i + 1

Loop

If flag = False Then
For j = 1 To 3
Cells(emptyRow, j).Value = UserForm1.Controls(“TextBox” & j).Value
Next j
End If

End If

End Sub

If the ID text box is not empty, Excel VBA edits the record on the sheet (the opposite of loading a record as we have seen earlier). If Excel VBA cannot find the ID (flag is still False), it adds the record to the next empty row. The variable emptyRow is the first empty row and increases every time a record is added.

24. Exit the Visual Basic Editor, enter the labels shown below into row 1 and test the Userform.

Excel VBA Interactive Userform